This is a post in my continuing series called Photography 101. I started this series at the beginning of May in an effort to reinforce all I’m trying to learn to better my photography. And I’m determined to bring y’all along with me.
Other Photography 101 subjects I’ve tackled:
lines
color
light
flare
and RAW vs. JPG
![]()
Ever find a flash card in your pocket? After your pants have gone through the wash?
Just me?
Well, I did find a flashcard in my pants. But I’m happy to say that my flash card seems unaffected. And so do the pictures, taken the day before Jude’s surgery as we were visiting our favorite folks in Iowa.
But this particular series of pictures had more a few more strikes against it than just a run through the washer. They were taken outdoors (good) but after sunset (bad) and my camera doesn’t do well with a cranked up ISO so I underexposed quite a few shots (bad).
BUT I was shooting in RAW (good). And I have a few post-processing tools at my disposal (great!).
And I thought it would be fun to work up a post to reveal the before, the in-between and after…
PICTURE 1:
![]()

This was the first picture I took. It’s my sweet friend, Lisa, and Miss Poppy.
Terribly underexposed, I edited it in LR to up the exposure, adjust the white balance and boost the color and brightness.
I also used the noise reduction tool because these were taken at upwards of ISO 1000. Which is a lot for my little camera.
![]()

When I got it into CS6, I ran some of my favorite actions: Florabella Classic Color, Lighten and Brighten and tweaked it to reduce some of the contrast.
![]()

Because these were shot in RAW, I was able to really bump up the exposure without ruining the picture – yay for RAW!
If you’re not familiar with shooting in RAW, check out my previous Photography 101 posts: RAW vs. JPG.
PICTURE 2:
![]()

Another underexposed picture. This time of our friends’ adorable cat, Prairie. He’s a crazy sweet cat with a crazy, big belly.
In an effort to to be respectful of his underside, I chose to go for a simple head shot.
Again, I upped the exposure, white balance, boosted the color and the brightness. Then I exported it to work on in Photoshop.
![]()

I ran the same actions on this one in CS6.
Since it wasn’t as underexposed as some of the others, I ran Lighten and Brighten but just decreased the opacity of it, to keep them all consistent.
![]()

And now Prairie is so much more handsome. Okay, not really.
But I do like the picture much better editing.
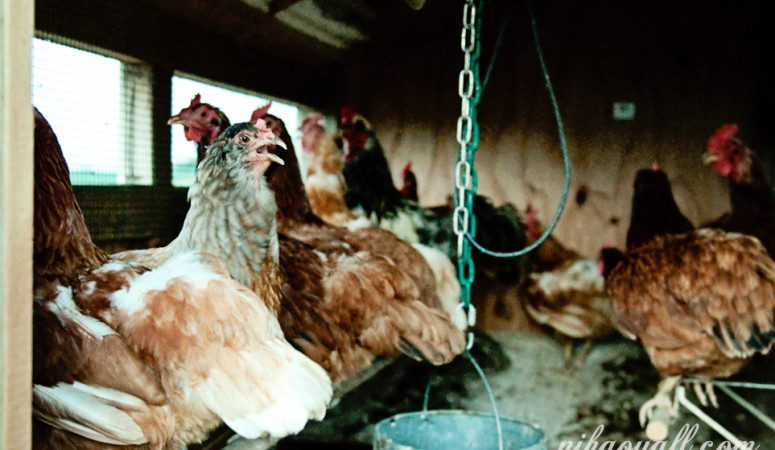
PICTURE 3:
![]()

Here is a picture inside their super-cool chicken coop. The downside was that it was even darker inside the coop than it was outside.
But I like chickens and wanted to get a picture. So I stuck my big melon in there and snapped away.
To edit, I did all the same things I did with the previous two pictures, but upped the exposure even more. And since this was shot at ISO 1600, I made sure all my noise-reduction tools were running at full tilt.
![]()

In Photoshop I ran the same actions and did a minor crop. I am getting a little better at cropping in-camera so I don’t have to do a lot of cropping when I edit, but this seemed a bit tilted to me.
And sometimes we just do things in post-processing because we can.
![]()

Now doesn’t that chicken look so much brighter? And sharper?
P.S. Yes, she was telling me off… specifically to get my camera out of her hen house.
PICTURE 4:
![]()

And here is the big daddy chicken. As in a rooster.
This is the only one of their chickens that is super tame… he had an unfortunate run-in with their dog and barely survived. It made him a very docile dude, which is nice if you’re gonna have a rooster.
I did pretty much the same edits in LR.
![]()

Pretty much the same edits in CS6.
![]()

And voila. A boy and his rooster.
PICTURE 5:
![]()

Hello? What exactly is in this picture?
Horribly underexposed (can you tell I detest bumping up my ISO? And that it was getting darker by the second?), it’s hard to even tell who or what is in this picture.
Hello exposure adjustment tool.
![]()

Same actions in CS6, just a heavier use of the Lighten and Brighten tool.
![]()

And what do you know? There are adorable kids in the picture!
Hello, boys! Hello, Boulder!
![]()
And that’s it. I hope this post gives you some encouragement to consider some of the outrageously helpful post-processing possibilities. I have just a teeny tiny grasp on Lightroom and Photoshop, but am amazed at all that can be done with a less-than-stellar photo. And these minor edits only took me a few minutes for each photo – less than 15 minutes for all of the editing on all these pictures in both LR and CS6. Of course, I could have edited much more earnestly… but this seemed sufficient.
Lightroom is available for a free 30-day trial. Be prepared to fall in love it you haven’t tried it. And no, I don’t get any compensation for referring anyone over there. I’m just a girl who loves her some Lightroom.
Photoshop is a much bigger program and is not intuitive at all (read: painfully difficult)… you need to take a class, read books, or watch tutorials if you want to learn how to work in Photoshop. I am in the process of learning and I am loving it, but it ain’t easy. But then again, I’m not super savvy, either.
The real beauty of post-processing is that you can edit your pictures exactly the way you like! You might not dig my edits, but you can get in there with your pictures and tweak and adjust them until you love ’em!
So go! Be prosperous! And post-process!!
I so appreciate how you demonstrated the use of post processing. Just the words scare me!! I am so amazed with you before and after shots. In the beginning of learning the post processing part, would have this set of photos taken much longer to edit??
Btw, we have a friend in common–Sheryl (leaving tomorrow for China)!! My little one was at the same SWI as Lucy..
I can hardly wait for Lucy Day!!
meg
Hey Meg! In the beginning, yes it would have taken me longer. But just like anything, with practice it gets sooo much easier. And I’m still really learning myself, so I hope that before long, my edits will take even less time 🙂
And YES, so excited for Andy and Sheryl… can’t wait to see Lucy in their arms!!
Oh you know I’m a Lightroom girl through and through!!!!
Nancy
Hello Stepanie,
i have followed your blog for some time now, 1 because we share the common bond of motherhood through biological and adoption and 2. because I am a budding new hobby photographer that loves your snaps – your really good!
i have just purchased some of the florabella actions and I am wondering – how do you apply th actions AND keep a natural skin tone? I love the actions but i can’t use them because my kids end up looking washed out.
I would so appreciate your advice. You can see some of my pics on my blog.
Thanks
Theressa
Australia.
Hey Theressa! I tried to check out your blog but I’m afraid I couldn’t get the link to work.
If your kids faces are looking washed out, you could try to add a layer mask, and decrease the opacity of the action on your kids faces. If you’re not sure how to add a layer mask, you can just google it and find a video or tutorial… I can do it, but I can’t easily explain how it’s done 😉
Thanks Stefanie,
I just need practice I think! and patience 🙂 I want to be an expert NOW!
I love your blog – it’s beautiful and so is your family. I love your use of colour and how you dress your babes – it looks wonderful in print.
http://puttytree.blogspot.com.au/
Theressa
Well I don’t know a darn thing about photography but just had to say the dog’s face in that last photo….*hilarious*!!! Seriously. Laughing. Thanks for the chuckle!
I know! I didn’t notice that until I did the final edits… couldn’t help but giggle!
I just went back and had a look at the dog, t’s 5.00am in the morning here in Australia and I just spat my coffee at the screen in a fit of laughter! What IS he thinking?
Theressa
Oh, I so agree.. When I got to the last photo, I don’t know if I had even noticed the dog there BUT that tongue on the last one… I laughed so hard.. love it…
Stephanie,
I love following your blog from time to time…number one because your kiddos are adorable and number two, because I love what you do with your photos! I am trying to pick some pics to be considered for the calendar to send to Emily with Henankids. But I keep looking at the photos and they dont look professional enough to submit….if I sent you a few, could you play with them so they would look like calendar quality?
Thank you!
Gail
Sure, Gail! Just email me your unedited, full-sized pics and I’ll see what I can do 🙂
Just wanted to make sure you got the five pics I sent you via email…
Thanks so much
I did! I’ll work on them and get back to you 🙂
Hi I am not sure how I found your blog possibly we were on the same class with Lisa Furey, but I have been following for about a year now and love reading about your gorgeous children and your learning curve into the realms of photography. I am nervous about editing and only use the tools that come with Aperture on my Mac. Your photos are amazing and I wondered how easy Lightroom is to learn. Thanks for sharing and giving me a kick forward.
One of my favorite tools in LR in situations like your photos above is the “fill light” slider — especially if you want to lighten up/bring your backgrounds. I find that you don’t have to increase the exposure so much (and thereby risk bringing in more ‘noise’). I ditto your recommendations of LR! I love it, love it, love it!!! It save SO much time!
except I just saw that LR 4 got rid of that slider… sorry! Nevermind.